Building A ChatGPT Wizard with MistralAI Using Taipy
Let's learn how to build a simple chatbot using the Taipy GUI library and the Mistral-7B-Instruct-v0.1-GGUF language model from the transformers library.
- Copied!

TL; DR
Let's learn how to build a simple chatbot using the Taipy GUI library and the Mistral-7B-Instruct-v0.1-GGUF language model from the transformers library.
The walkthrough
- loading the language model
- generating responses to user prompts
- updating & clearing conversation history
- application styling
By the end of this article, we will have a basic understanding of how to build a chatbot using these tools.
1. Loading the Mistral-7B-Instruct-v0.1-GGUF model
Mistral 7B is a super-smart language model with 7 billion parameters! It beats the best 13B model, Llama 2, in all tests and even outperforms the powerful 34B model, Llama 1, in reasoning, math, and code generation. How? Mistral 7B uses smart tricks like grouped-query attention (GQA) for quick thinking and sliding window attention (SWA) to handle all sorts of text lengths without slowing down.
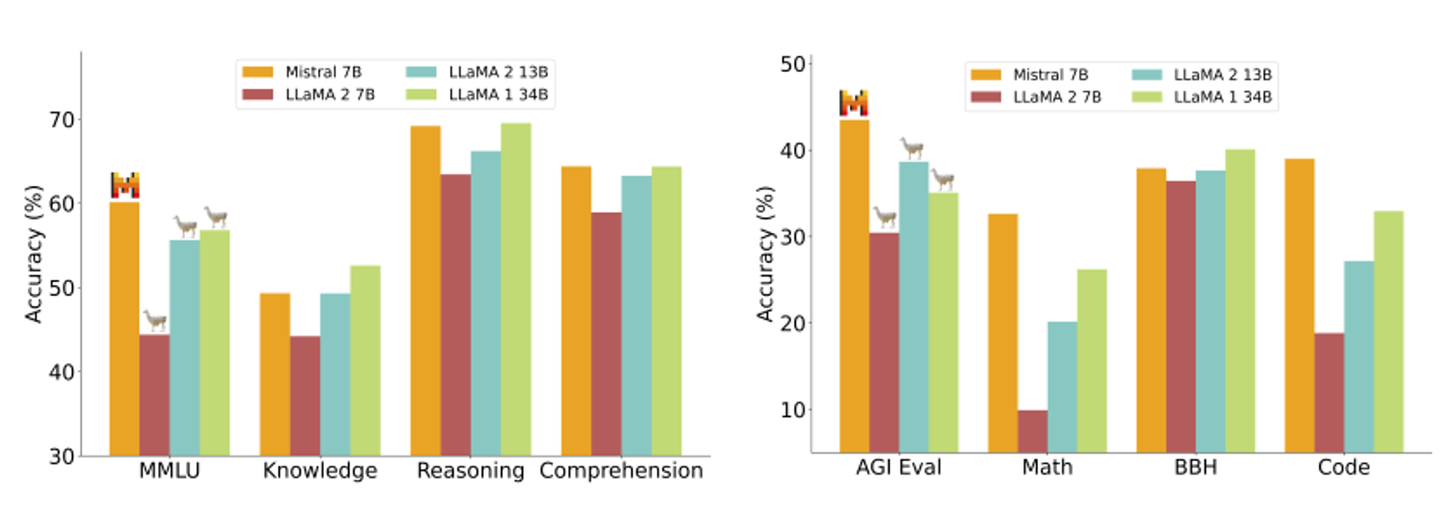
Source: Mistral.AI Docs
And there's more! Mistral AI Team fine-tuned Mistral 7B for specific tasks with Mistral 7B – Instruct. It outshines Llama 2 13B in chat and rocks both human and automated tests. The best part? Mistral 7B – was released under the Apache 2.0 license.
Download GGUF files using ctransformers
Step 1: Install ctransformers
With no GPU acceleration
pip install ctransformersor install with ctransformers with CUDA GPU acceleration
pip install ctransformers[cuda]or install with ctransformers with AMD ROCm GPU acceleration (Linux only)
CT_HIPBLAS=1 pip install ctransformers --no-binary ctransformersor install with ctransformers with Metal GPU acceleration for macOS systems only
CT_METAL=1 pip install ctransformers --no-binary ctransformersStep 2: Install Langchain
pip install langchainLoad the model
All set? Let's run the code below to download and send a prompt to the model. Make sure to free up space on your computer and connect to a good internet connection.
# import the AutoModelForCausalLM class from the ctransformers library
from ctransformers import AutoModelForCausalLM

# load Mistral-7B-Instruct-v0.1-GGUF, Set gpu_layers to the number of layers to offload to GPU. The value is set to 0 because no GPU acceleration is available on my current system.
llm = AutoModelForCausalLM.from_pretrained("TheBloke/Mistral-7B-Instruct-v0.1-GGUF", model_file="mistral-7b-instruct-v0.1.Q4_K_M.gguf", model_type="mistral", gpu_layers=0)

# call the model to generate text.
ask = 1000
turn = 0
while turn < ask:
    user = input("Enter your message: ")
    print(llm(user))
The model will continue the statement as follows,

2. Installing Taipy
Taipy is an open-source Python library that makes it simple to create data-driven web applications. It oversees the visible part (Frontend) and the behind-the-scenes (Backend) operations. Its goal is to speed up the process of developing applications, from the early design stages to having a fully functional product ready for use.
⭐⭐⭐ Star us on GitHub ⭐⭐⭐

Source: Taipy Docs
Requirement: Python 3.8 or later on Linux, Windows, and Mac.
Open up a terminal and run the following command to install Taipy with all its dependencies.
pip install taipyWe're set!
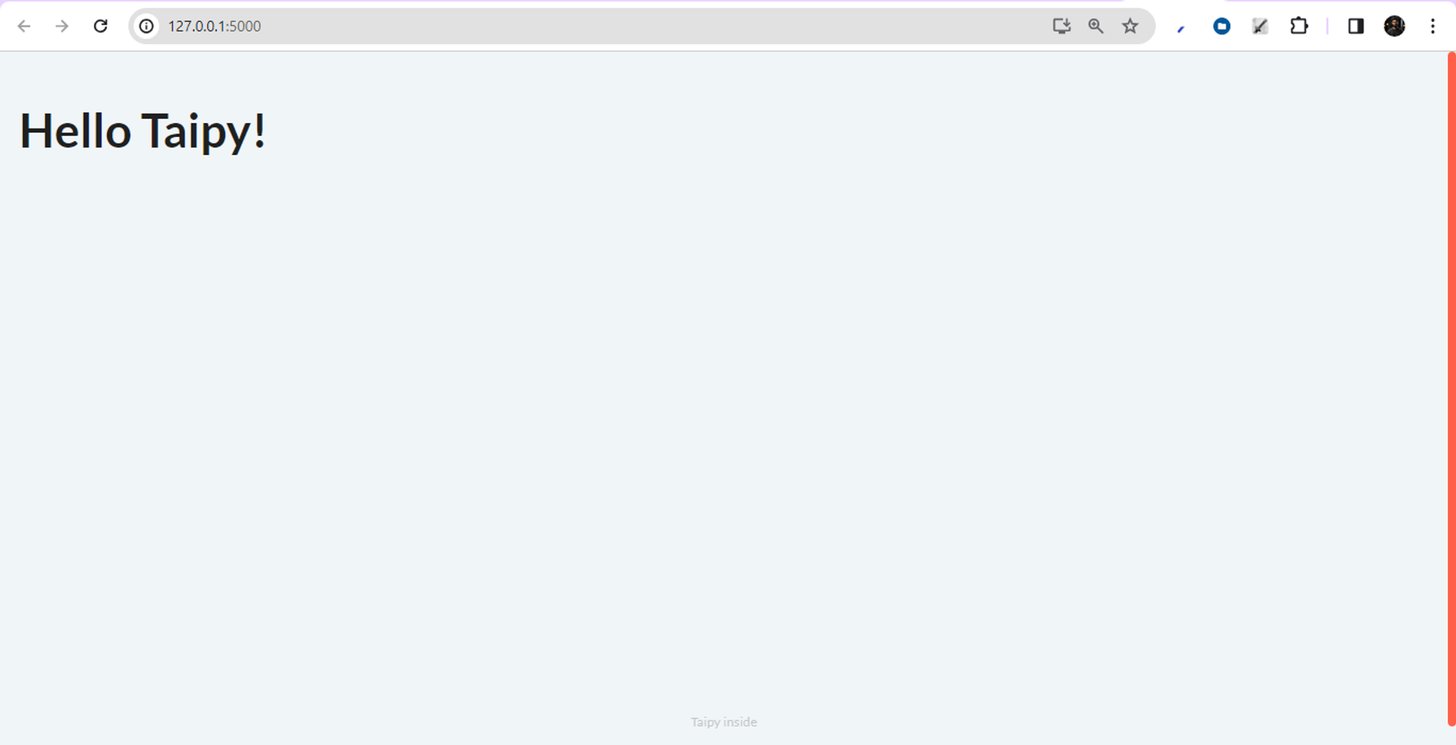
Let's say hello to Taipy!
# import the library
from taipy import Gui

hello = "# Hello Taipy!"

# run the gui
Gui(hello).run()
Save the code as a Python file: e.g., hi_taipy.py.
Run the code and wait for the client link http://127.0.0.1:5000 to display and pop up in your browser.
You can change the port if you want to run multiple servers at the same time with Gui(...).run(port=xxxx).
3. Create a chat interface with Taipy
Now we are familiar with Taipy, let's get our hands dirty and build our chat interface.
Step 1: Import the AutoModelForCausalLM class from the ctransformers library
This will generate text using pre-trained language models.
from ctransformers import AutoModelForCausalLMStep 2: Import the Taipy GUI library
Used to build the chatbot user interface
from taipy.gui import Gui, notifyStep 3: Load the Mistral-7B-Instruct-v0.1-GGUF model
llm = AutoModelForCausalLM.from_pretrained("TheBloke/Mistral-7B-Instruct-v0.1-GGUF", model_file="mistral-7b-instruct-v0.1.Q4_K_M.gguf", model_type="mistral", gpu_layers=0)Step 4: Initialize the prompt and response variables as empty strings.
prompt = ""
response = ""
Step 5: Define the chat function
Called when the user clicks the "Chat" button in the user interface. This function takes the current state of the GUI as input, generates text using the pre-trained language model based on the user's prompt, and updates the response variable in the state.
def chat(state):
    notify(state, 'info', 'Thinking...')
    state.response = llm(state.prompt)
Step 6: Define the user interface with Taipy GUI
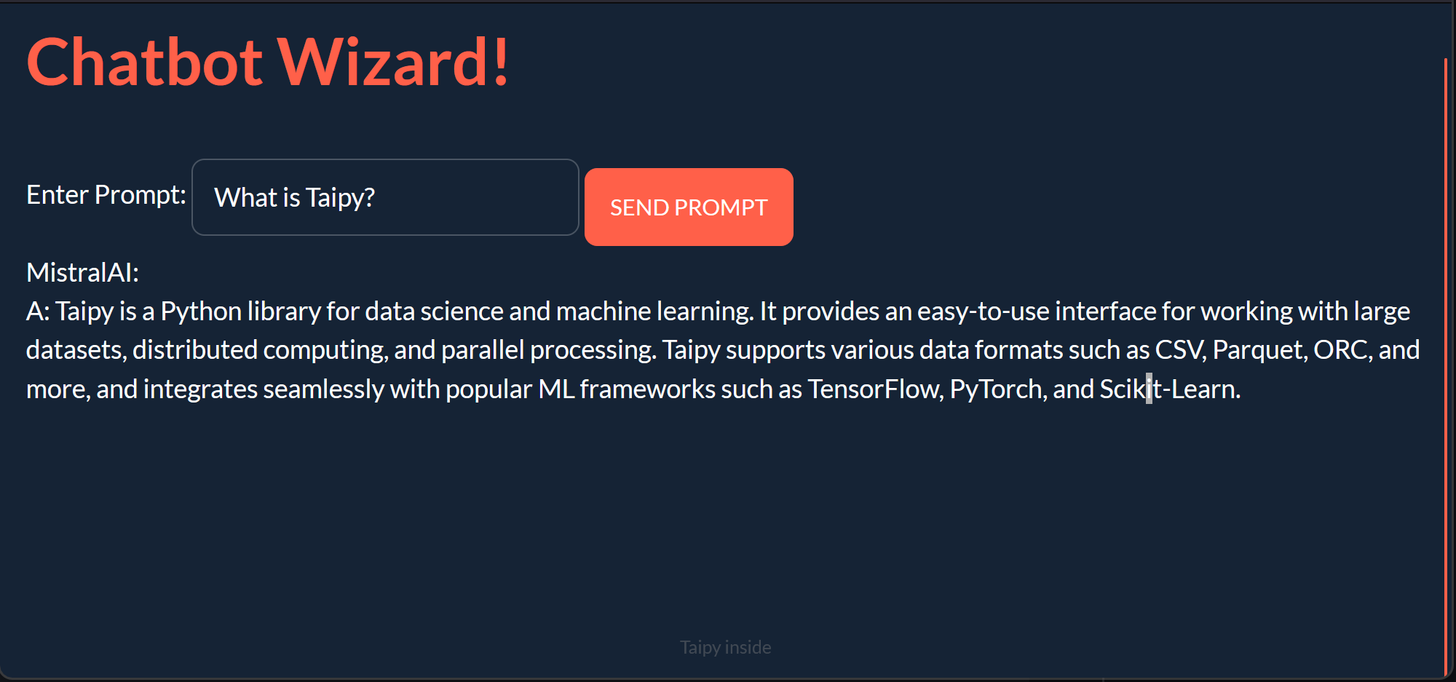
Time to define the user interface for our chatbot using the Taipy GUI library. The user interface consists of an input field where the user can enter a prompt, a "Chat" button that triggers the chat function, and a display area where the chatbot's response is shown.
page = """
# Chatbot Wizard! {: .color-primary}
Enter Prompt: <|{prompt}|input|> <br />
<|Chat|button|class_name=plain mt1|on_action=chat|> <br />
MistralAI: <br /> <|{response}|>
"""
Step 7: Run!
Now, let's run the Taipy GUI application using the run method.
Gui(page).run(debug=True)Full Code
# Full Code

# import the AutoModelForCausalLM class from the ctransformers library
from ctransformers import AutoModelForCausalLM

# import taipy library
from taipy.gui import Gui, notify

# load Mistral-7B-Instruct-v0.1-GGUF, Set gpu_layers to the number of layers to offload to GPU. The value is set to 0 because no GPU acceleration is available on my current system.
llm = AutoModelForCausalLM.from_pretrained("TheBloke/Mistral-7B-Instruct-v0.1-GGUF", model_file="mistral-7b-instruct-v0.1.Q4_K_M.gguf", model_type="mistral", gpu_layers=0)

# initialize the `prompt` and `response` variables as empty strings.
prompt = ""
response = ""

def chat(state):
    notify(state, 'info', 'Thinking...')
    state.response = llm(state.prompt)

page = """
# Chatbot Wizard! {: .color-primary}
Enter Prompt: <|{prompt}|input|>
<|Send Prompt|button|class_name=plain mt1|on_action=chat|> <br />
MistralAI: <br /> <|{response}|>
"""

Gui(page).run(debug=True)
Results
Here it is, a simple chat interface!
Let's level up our application to become a chatbot, as we imagine.
4. Set the Mistral AI Chatbot
Step 1:
In this step, we initialize the prompt and response and the conversation
prompt = ""
response = ""
conversation = {
    "Conversation": ["Hello", "Hi there!   What would you like to talk about today?"]
}
Step 2:
Update the chat function
def chat(state):
    # Notify the user that the chatbot is thinking
    notify(state, 'info', 'Thinking...')

    # Generate a response using the loaded language model
    response = llm(state.prompt)

    # Add the user's prompt and the bot's response to the conversation history
    state.conversation["Conversation"].append(state.prompt)
    state.conversation["Conversation"].append(response)

    # Update the conversation object to contain the entire conversation history
    state.conversation = {"Conversation": state.conversation["Conversation"]}

    # Clear the user's input prompt
    state.prompt = ""

    # Notify the user that the bot has generated a response
    notify(state, 'info', 'Response received!')
Step 3:
Add clear_conversation function to clear the conversation history.
The function sets the state.conversation object to a new dictionary with a single key-value pair, where the key is Conversation, and the value is an empty list. This effectively clears the conversation history, as the state.conversation object is now an empty dictionary with a single key-value pair containing an empty list. The updated state.conversation object will be reflected in the chatbot UI, showing an empty conversation history.
def clear_conversation(state):
    state.conversation = {"Conversation": []}
Step 4:
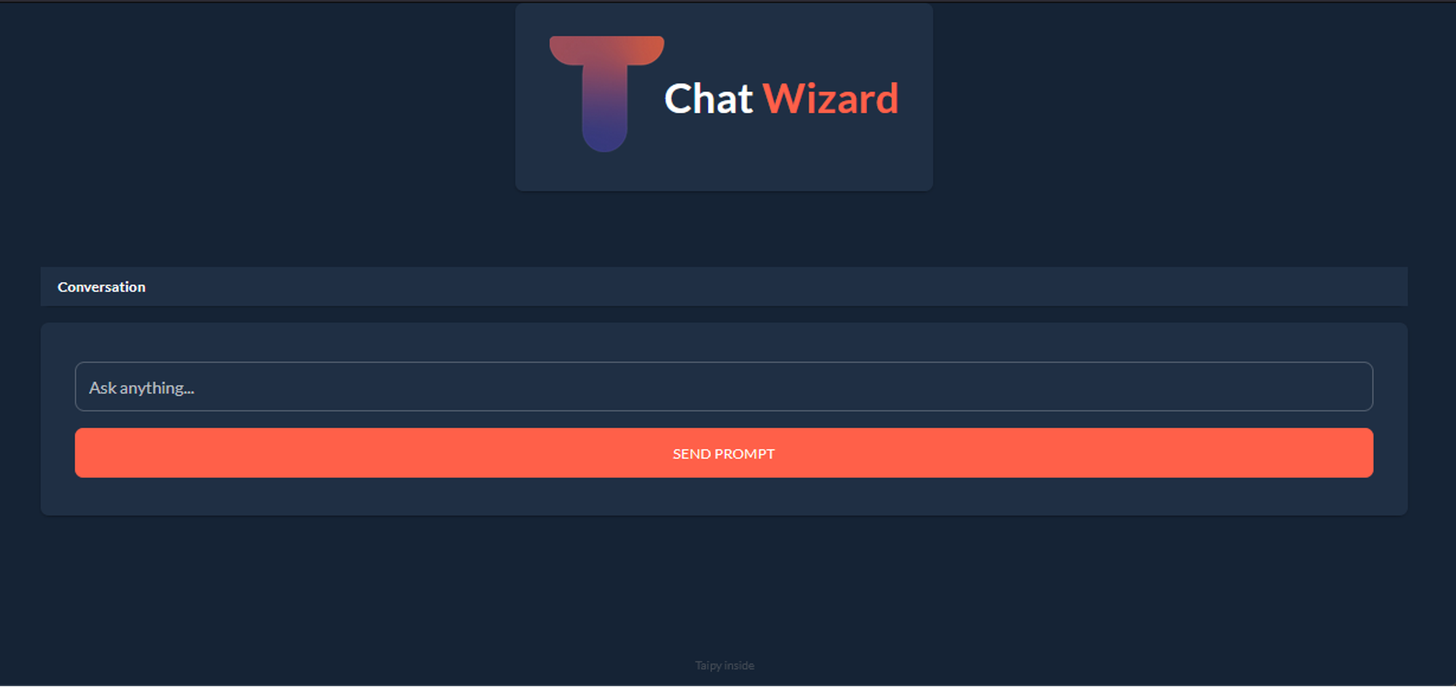
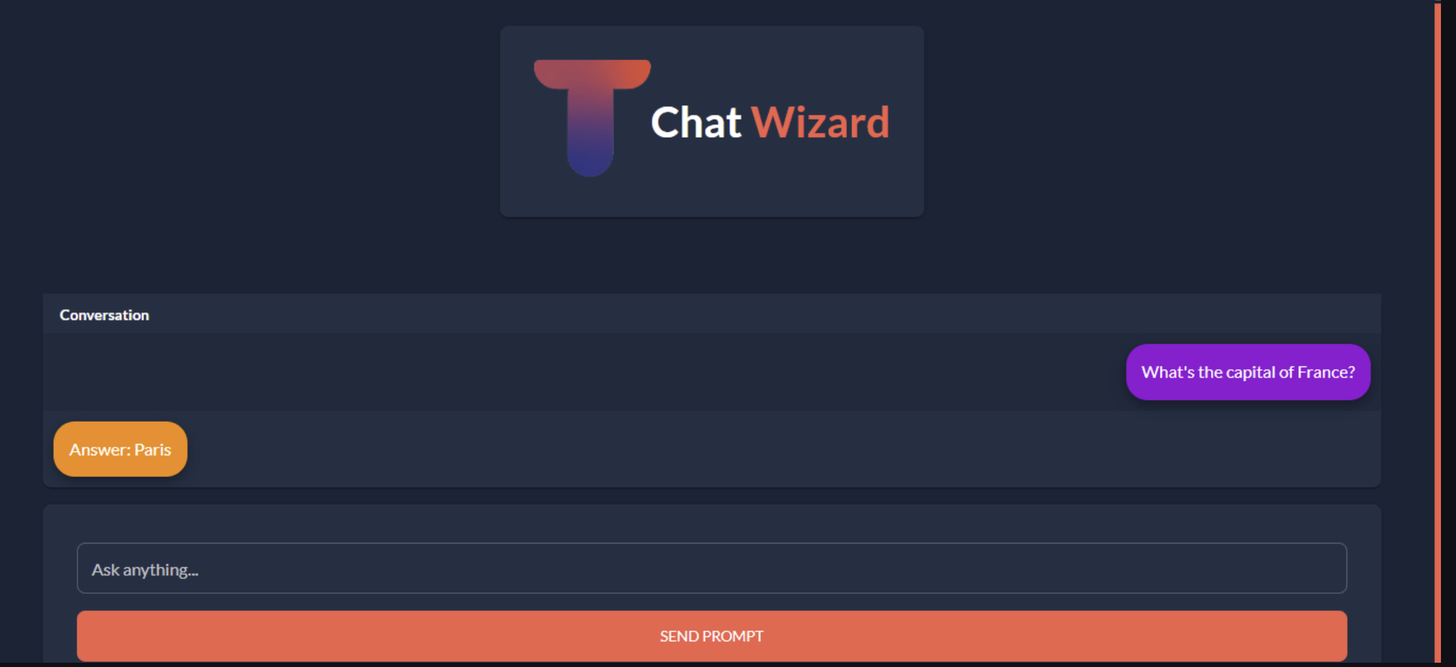
Let's define the layout of the user interface for the Chatbot. Let's add a logo by downloading and saving it in the same directory as the script. Then attach clear_conversation to the New chat button.
5. Styling the chatbot
Now, let's style our chat UI by floating the response to the left and the prompt to the right-hand side with some CSS.
Step 1:
Create a CSS file with the same title as the python file and save it in the same directory.
.mistral_mssg td {
    position: relative;
    display: inline-block;
    margin: 10px 10px;
    padding: 15px;
    background-color: #ff8c00;
    border-radius: 20px;
    max-width: 80%;
    box-shadow: 0 4px 8px 0 rgba(0, 0, 0, 0.2), 0 6px 20px 0 rgba(0, 0, 0, 0.19);
    font-size: medium;
  }

  .user_mssg td {
    position: relative;
    display: inline-block;
    float: right;
    margin: 10px 10px;
    padding: 15px;
    background-color: #9400D3;
    border-radius: 20px;
    max-width: 80%;
    box-shadow: 0 4px 8px 0 rgba(0, 0, 0, 0.2), 0 6px 20px 0 rgba(0, 0, 0, 0.19);
    font-size: medium;
  }

.flexy{
    display: flex;
    justify-content: center;
    max-width: 50vw;
    margin: 4em auto;
    align-items: center;
}
Step 2:
Create the style_conv function: The style_conv function is a callback function used to apply styles to the conversation history table in the Taipy GUI. It takes three arguments: state, idx, and row.
The state argument is a dictionary containing the GUI's current state, including the conversation history. The idx argument is the index of the current row in the table, and the row argument is the index of the current column in the table.
The function checks the value of the idx argument to determine which style to apply to the current row. If idx is None, the function returns None, indicating no style should be applied.
If idx is an even number, the function returns the string user_mssg, corresponding to the CSS class for the user's prompts. If idx is an odd number, the function returns the string mistral_mssg, corresponding to the CSS class for the chatbot's responses.
Here is the code for the style_conv function:
def style_conv(state, idx: int, row: int) -> str:
    if idx is None:
        return None
    elif idx % 2 == 0:
        return "user_mssg"  # return user_mssg style
    else:
        return "mistral_mssg"  # return mistral_mssg style
To use the style_conv function in the Taipy GUI, we need to pass it as the value of the style attribute in the table element. For example:
<|{conversation}|table|style=style_conv|show_all|width=100%|rebuild|>Step 3:
Add a sidebar: Redefine the page to add the sidebar.
page = """
<|layout|columns=300px 1|
<|part|render=True|class_name=sidebar bg_black|
# Chat **Wizard**{: .color-primary} # {: .logo-text}
<|New Chat|button|class_name=fullwidth plain|on_action=clear_conversation|>

### History
<|{history}|table|show_all|>
|>

<|part|render=True|class_name=p2 align-item-bottom table|
<|{conversation}|table|style=style_conv|show_all|width=100%|rebuild|>

<|part|class_name=card mt1|
<|{prompt}|input|label=Ask anything...|class_name=fullwidth|on_action=chat|>
<|Send Prompt|button|class_name=plain mt1 fullwidth|on_action=chat|>
|>
|>
|>
"""
Conclusion
To conclude with, this article demonstrated how to build a simple chatbot using the Taipy GUI library and the Mistral-7B-Instruct-v0.1-GGUF language model from the ctransformers library. The code provided shows how to load the language model, generate responses to user prompts, update the conversation history, and clear the conversation history. The chatbot's UI, built using the Taipy GUI library, provides a user-friendly interface for interacting with the chatbot. Overall, this article provides a useful starting point for building more sophisticated chatbots using these Taipy.
Resources:
- HuggingFace: Mistral-7B-Instruct-v0.1-GGUF
- Taipy: Taipy Docs
- Copied!